Hellllooooo! Sara here from Mrs. P's Special Education Classroom.
I'm starting a new blog series for our Colorado Teacher Collaborative Blog: Resources with Altitude. The series will focus on using iTechnology in your classroom.
While some of these tips might already be in play in your classroom, it's amazing how many teachers are presented with technology without any sort of professional developments or guides.
Today's session will be how to create custom wallpaper for your classroom iPads & iPods and how to install it. I have seen many classrooms use the wallpaper and lock screen as a way to keep track of the devices. In my classroom, I had an iPad for each student (I only had 4 students last year....lucky me!). I didn't need to keep track of which iPad was which, but I did need to create wallpaper so that students did not tamper with it (I taught Middle School...............).
HERE'S HOW I DID IT!
I started by opening a document in PowerPoint.
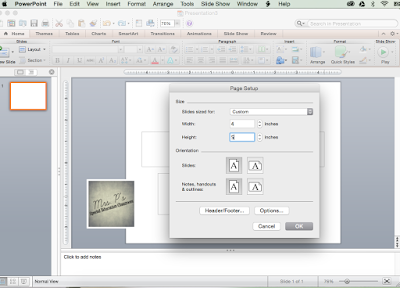
Click File then Page Setup.
Once you hit Page Setup, a pop up will come on your screen. Set your width to 4 inches and the height to 5 inches.
Once you click OK, your document will look like this.
Now comes my favorite part of this process!
DESIGN!!
I use digital scrapbook paper that I have purchased as backgrounds for all of my products and designs. When I create my backgrounds I like to add them as Backgrounds instead of pictures so that the paper does not move while I'm creating. To do this, I click Theme in my Home Bar. I then go to the far right and click background which will bring a drop down menu to your screen. Select Format Background.
A Pop Up will come on to your screen. At the top of the Pop Up, you will have 4 options. Choose Picture or Texture. Then choose Choose Picture. This will give you the opportunity to locate the specific scrapbook paper or picture you want to use as your background. Once you have selected your photo, click Apply.
Your document will look similar to this (with whatever design you choose). You will not be able to move your background, but if you want to make another choice, just go through the steps again.
Once you have your background, you are free to add text boxes and insert clipart into your document, just as you would if you were designing a product for TPT or your classroom.
Once you have finished, click File then Save As...
Save your document as whatever you want for the name. I ALWAYS save to my Desktop then move it to where I need it after I have finished posting or sending it. For the format, click the arrow that will pull down a drop down menu. Click JPEG. This will save your document in a Folder on your desktop.
ONce you have saved your document, it's now time to transfer your iTechnology background to your device. If you have a newer mac, you can "Airdrop" your document to your device. It means that you're sending your document over your personal network. Before "Airdrop" was available to me, I would either send it via text message or email.
Once on your document is on your iPad, open up your Pictures App. Touch the document you want to use as your iPad Wallpaper. In the bottom left hand corner, there will be a box with an arrow pointing up. Press that box.
When you press the box with the arrow pointing up, Options will be brought up on the bottom of the screen. On the bottom row, you will see an option to Use as Wallpaper. Touch the Option.
The last step in this process is to choose if you want the wallpaper to be used as your Lock Screen or your Home Screen. The Lock Screen is what you will see when you wake your iPad up from sleep by pressing the HOme button. The Home Screen will be the background that is behind your apps after you have put in your passcode.
WAAAAHHHHHLAAAHHH! You've done it!
Look for other tips and tricks in this series in TWO WEEKS! We will be focusing on how to lock a student in a specific app -----> A GODSEND FOR LITTLES AND SNEAKY SNEAKERSONS!!!!


No comments:
Post a Comment