. . . .

Thursday, June 25, 2015

Technology Thursday: Tips for Using iTechnology in the Classroom


Hellllooooo! Sara here from Mrs. P's Special Education Classroom.

I'm starting a new blog series for our Colorado Teacher Collaborative Blog: Resources with Altitude. The series will focus on using iTechnology in your classroom. 


While some of these tips might already be in play in your classroom, it's amazing how many teachers are presented with technology without any sort of professional developments or guides.

Today's session will be how to create custom wallpaper for your classroom iPads & iPods and how to install it. I have seen many classrooms use the wallpaper and lock screen as a way to keep track of the devices. In my classroom, I had an iPad for each student (I only had 4 students last year....lucky me!). I didn't need to keep track of which iPad was which, but I did need to create wallpaper so that students did not tamper with it (I taught Middle School...............).

HERE'S HOW I DID IT! 

I started by opening a document in PowerPoint. 
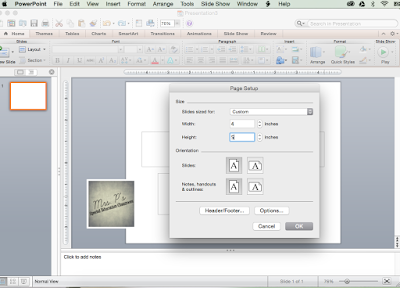
Click File then Page Setup.

Once you hit Page Setup, a pop up will come on your screen. Set your width to 4 inches and the height to 5 inches. 


Once you click OK, your document will look like this. 


Now comes my favorite part of this process!
DESIGN!!

I use digital scrapbook paper that I have purchased as backgrounds for all of my products and designs. When I create my backgrounds I like to add them as Backgrounds instead of pictures so that the paper does not move while I'm creating. To do this, I click Theme in my Home Bar. I then go to the far right and click background which will bring a drop down menu to your screen. Select Format Background.


A Pop Up will come on to your screen. At the top of the Pop Up, you will have 4 options. Choose Picture or Texture. Then choose Choose Picture. This will give you the opportunity to locate the specific scrapbook paper or picture you want to use as your background. Once you have selected your photo, click Apply. 


Your document will look similar to this (with whatever design you choose). You will not be able to move your background, but if you want to make another choice, just go through the steps again.


Once you have your background, you are free to add text boxes and insert clipart into your document, just as you would if you were designing a product for TPT or your classroom.

Once you have finished, click File then Save As...


Save your document as whatever you want for the name. I ALWAYS save to my Desktop then move it to where I need it after I have finished posting or sending it. For the format, click the arrow that will pull down a drop down menu. Click JPEG. This will save your document in a Folder on your desktop. 


ONce you have saved your document, it's now time to transfer your iTechnology background to your device. If you have a newer mac, you can "Airdrop" your document to your device. It means that you're sending your document over your personal network. Before "Airdrop" was available to me, I would either send it via text message or email. 


Once on your document is on your iPad, open up your Pictures App. Touch the document you want to use as your iPad Wallpaper. In the bottom left hand corner, there will be a box with an arrow pointing up. Press that box. 

When you press the box with the arrow pointing up, Options will be brought up on the bottom of the screen. On the bottom row, you will see an option to Use as Wallpaper. Touch the Option. 


The last step in this process is to choose if you want the wallpaper to be used as your Lock Screen or  your Home Screen. The Lock Screen is what you will see when you wake your iPad up from sleep by pressing the HOme button. The Home Screen will be the background that is behind your apps after you have put in your passcode. 


WAAAAHHHHHLAAAHHH! You've done it! 

Look for other tips and tricks in this series in TWO WEEKS! We will be focusing on how to lock a student in a specific app -----> A GODSEND FOR LITTLES AND SNEAKY SNEAKERSONS!!!!


Monday, June 22, 2015

Hello! From Music a la Abbott

Hi there!!!  My name is Amy Abbott of Music a la Abbott.

I also am a blogger on a collaborative blog called Kodály Corner.

About me:
I am a PROUD Colorado native.  I was born in Denver and when I was one we moved to Lafayette.  My parents are also Colorado natives, my mom is from Louisville and my dad from Englewood.  I have a young brother, Aaron, who lives now in my Granny's old house in Louisville and my parents live in the house that I grew up in.

I am also a PROUD University of Colorado alum, GO BUFFS!!!!  After I graduated with my Bachelors in Music Education in 1998 I moved to Salem, OR and taught there for three years. Teaching wise, it was the BEST situation I could have asked for but personally I really missed my family. So, in 2001 I moved back to Colorado.  That summer at my brother's wedding I was re-introduced to the man who would become my husband.  Reintroduced?  Yes, we went to high school together!  In fact, I had both of his parents for teachers in high school (his mom was my freshman Language Arts teacher and his dad was my Phys. Ed. teacher for two semesters).  I also received my master in music education with a Kodály emphasis from Colorado State University and hold Kodály certifications from both Portland State University and Colorado State University.

We have been blessed with two amazing kids, Noah and Hannah.  Here's a picture of my wacky clan:

My family is composed of teachers, both my in-laws were teachers, my mom and brother are both music teachers (my little bro is the band teacher at Centaurus High School), my husband is a teacher at Monarch High school, my brother's wife teaches at a middle school in my district (both she and my hubby are history teachers) one of my brother-in-laws teaches 4th grade at Flynn Elementary in Adams 50 and my other brother-in-law just quit his engineering job to go back to school to become a teacher, he's getting certified in math, science and art.  Phew!  Yes, we "talk shop a lot".

I have been teaching in St. Vrain Valley School district for 14 years, with the last 4 at Red Hawk elementary.  It's quite an amazing school and the best part is my own two kids go there! Noah will be in 3rd grade and Hannah will be in kindergarten.  Noah's been known to walk by on the way back from recess and say hi:

And Hannah has been there for two years already, attending preschool and sitting through many choir and handbell rehearsals.  When she wasn't sitting through rehearsals before school she was pretending to lead them:

At Red Hawk I see over 800 kids a week, seeing all the preschool-5th graders. Before school I teach choir 2 mornings a week and handbells two mornings a week.  I do get to see my preschoolers as I volunteer my prep and lunch times to see them.  I'll get into this a little bit more a little later.  

Last year we did our first musical, Seussical!  It was so much fun!  A 2nd grade teacher (who has a bachelors in theater), a parent volunteer (who has a doctorate degree in musical theater) and I collaborated:

We had so much fun that we're tackling this one next year:

Finally, I also teach in the summer!  I'm the level 2 Kodály Pedagogy, Folk Song and Analysis teacher at Colorado State University with these two lovely ladies who teach level 1 & 3 with me: Tanya LeJeune, who teaches in JeffCo and Karla Cherwinski, who teaches in Ohio:

Music and collaboration
Now, enough about me! Phew, I don't usually go into that much detail.  One more thing I will share is I believe strongly in the power of music education.  We all know, or we have heard, about the impact that music has on other subject areas, which is what I'm going to touch on in this post, but more so I believe that music education has tremendous value and importance in education without depending on how it affects and impacts other subject areas (not to say this in not important too!).  Music teaches children how to express themselves, how to find their voice, how to relate to the world around them and most importantly, it brings joy and expression to their lives.  My number one goal is for my students to become singers and musicians, for them to be able to express themselves in a safe and supportive environment and for them to learn to take musical risks.

That all said, one of my professional goals this year is to collaborate with my preschool and kindergarten teachers to use common materials in my class and their language arts classes.  Being a Kodály teacher (for those non-music folk, Kodály is a philosophy of teaching music in which the heart of it lies that music is for everyone, singing is the basis and the folk music of the mother language of the child is the basis then branching out into music of other cultures and art music), nursery rhymes and chants are used a lot in my preschool and kindergarten classes.  So, we will be discussing what they use, how I can teach musical skills with the common materials and what they can teach for literacy (and even math).

This week I met with one of my preschool teachers and they use LRI in their classes.  So I'm going to be using the nursery rhymes that they will use each week in class when I come in for music to teach musical skills such as beat, vocal exploration, rhythm, etc., and they will use it to teach rhyming and sight words.  I'm making them visuals to use, including cue cards and "rhymes on a ring" that they can use for the students to chose which rhyme they want to say but also some sight word worksheets for their littles, like these two examples:


I'm so excited to be a part of this collaborative blog and sharing some ideas with you related to music and classroom connections!


Friday, June 19, 2015

Friday in Fourth

Hello,

I'm Janet from Bloomin' Bees, and I'm excited to have the opportunity to be a guest blogger on Resources with Altitude!


I've just finished up my twentieth year of teaching. (No I'm not old, I'm just "seasoned.")  Lol!   I'm currently a fourth grade teacher, thus the blog post title of "Friday in Fourth."   I've also taught grades 2, 3, 4, 5, 6, been a technology specialist, and a reading/writing interventionist.  So, needless to say, I have a great understanding of the scope and sequence of where my fourth graders have been and where they need to go.  The crazy part of all my years in teaching is that I double majored in college in elementary ed and early childhood ed, because I KNEW I was going to be a kindergarten teacher.  What haven't I taught?  That would be kindie and first grade!  When you're right out of college and are offered a job as a 5/6 combo teacher, you take it!  After a couple years I (1) became labeled as an intermediate teacher and (2) was financially invested in intermediate.  Several people have asked me what my favorite grade is, and quite honestly, I love them all for different reasons.

Speaking of college, I attended the University of Nebraska at Lincoln for my bachelor's degree and University of NE at Omaha for my master's degree.  Being born and raised in Omaha, NE I naturally had that HUSKER blood in me.  GO BIG RED!!!!  I was lucky enough be in Lincoln during the Tom Osborne era and witness back to back national championships in 1994 and 1995.  (I know-- a lot of people reading this blog were probably still in elementary school at that time).  


I live in SE Aurora with my husband of fourteen years and my three adorable meowing children.  Due to an extremely rough battle with cancer shortly after being married, we are unable to have any children except the four-legged variety.  Although this has been tough at times, I find I can be so much more of a loving and patient teacher for my students.  They are always excited in August when I officially "adopt" them for the year as "my children."  


Sad to say, but I'm a bit of the nerd type teacher.  I enjoy spending my evenings and summer scouring the web for fun teaching ideas and producing resources to help students interact and understand the standards better.  Teachers Pay Teachers and Pinterest have proven to be MAJOR time suckers for me!  

When I'm not nerding out, I love to spend time in the mountains with my husband (hiking and camping), visiting family back in Nebraska, scrapbooking, and gardening.  (Oh right, we can't forget Candy Crush--the BIGGEST time sucker of them all!)


You can expect blog posts about ideas, tips, and resources to incorporate into your intermediate classroom from me.  

A project that I'm working on this summer arose out of a need to conserve on the transition time it takes for children to move from their seats to the kidney table when I pull small groups. Since we don't have enough chairs to have extras around the table, I have to patiently wait for students to clink and clank their chairs from their desks to the back of the room.  Wouldn't it be nice to have readily available seating?  So, I'm now channeling my inner carpentry skills as I create these fun stools.  Right now I'm just drilling one screw through the top to hold on each leg.  If anyone knows a better way to secure the legs on, such as a brace or something, I'd love to hear about it.  I'm thinking these will start to wobble a bit after awhile if I don't reinforce.  My best bet may be to take one up to Home Depot and pick their experienced brains.  My next step is to buy padding for the seats and sew a denim (durable) cover for the top of the padding.  I plan to adhere is to the wooden stool with velcro, so I can wash them occasionally.  (sew velcro to cover and staple other side to underneath of stool)


That's all for today.  Thanks for taking the time to read my post, and I look forward to getting to know other teachers, bloggers, and TpTers through this blog site!

You can follow me at my personal blog, my Facebook page, or on my TpT store.


Monday, June 15, 2015

Music Monday with Sue McTigue!


Music Monday with Sue McTigue  


Hello from Colorado Springs! It’s so energizing to be a part of this wonderful group of TPT teachers in Resources With Altitude!
My store blog is just getting started at Teach Me With a Song Blog and you can visit my Facebook page to learn more about me and my experiences and teaching tips in Music and Arts Education.

In addition to 32 years of teaching experience, I have a BME degree (Music Ed), Orff & Kodaly certificates, a Symbaloo trainer certificate and an MA in Creative Arts & Learning/Curriculum Development.

I live with my wonderful husband, talented and wonderful step children and my new Toy Fox Terrier puppy, Sky!


I am currently working on a children's book with music about the adventures of Sky.  He goes everywhere with me, including a weekly ride or two on my paddle board.

I have been retired (sort of) for one year. I currently enjoy composing, teaching private piano, guitar, & voice and mentoring teachers in technology, curriculum planning and idea generating. If that isn't enough, I train teachers in Notebook Software,  SMARTboard and Symbaloo as a private contractor giving me the opportunity to connect with my favorite people, teachers!

My first choral piece, entitled, "Teach Me With a Song"  was recently published by BriLee Music Publishing (Carl Fisher) and can be viewed and heard at BriLee Music. It was premiered at the Douglas County School District Honor Choir performances in February and April of 2015.  Please enjoy the video of the DCSD Honor Choir 2015 premiere of my 2 part (optional 3 pt.) choral piece, "Teach Me With a Song".
This piece was inspired by one of my students with autism who insisted he learn everything through song.  My Teachers Pay Teachers store is named in honor of this student who's common request was, "Teach me with a song!"


I have also written a geological music program for 3rd - 5th grade about rocks, minerals and changes of the earth entitled, "Rock Concert!"  It comes with a CD of accompaniment tracks with and without vocals, script and printed music.  It has all ready been performed several times in Colorado and other states.

Here is a link to a freebie for you, a notebook file for interactive whiteboard using nursery rhymes and hearts to help K-2 students learn and understand the basic rhythm notation with quarter notes & rests, and eighth notes.  It is a very flexible file which allows for much creativity of teacher and students.  Enjoy!


Please let me know if I can help you with your teaching in anyway by creating a custom notebook file, song, worksheet or lesson just for you.  Since I'm retired but still very involved in current music education, I have lots of time and expertise to create the perfect resource you need.  Just let me know what it is!


Saturday, June 13, 2015

Vocabulary Word Wall - Meet Hannah from The Classroom Key

Hi there!  I'm Hannah and I blog over at The Classroom Key.


About Me

I have some tips for you about implementing a vocabulary word wall, but first, a little about me: I taught 2nd grade for five years and was a library media specialist for three years.  I have a 9-year-old girl and a 1-year-old boy.  We love living in Colorado!


This is our dog, Chuck.  He wasn't very excited about the neighborhood luau in this photo ; )


Vocabulary Word Walls


On to word walls!  I frequently see word walls for sight words but another way to use them is to boost vocabulary.  This would be especially appropriate for students in 2nd grade and above who typically don't need as much support with sight words.  

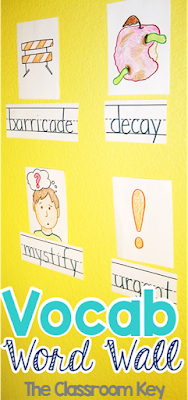
vocabulary word wall


One year I had a juggernaut of a word wall (speaking of vocabulary...haha!) that took up lots of space and  had a place for each letter.  Each day when I read my students a picture book, I introduced a tricky word I knew would be in the book and had a picture to represent it.  After the read aloud we would add the word and the picture to the wall and refer back to it later.  While I think this was beneficial for my students, especially since they were all English language learners, it did get a bit overwhelming, and I'm not sure we interacted with the old words enough.

I find teaching to frequently be about finding creative solutions to problems.  They key to solving the unweidly word wall problem.....is to create a mini word wall!  

vocabulary word wall

Use 7 to 10 Words at a Time-
Using a smaller number of words has a few different benefits.  It's easier for students to look for examples of the words in context if they're focused on a smaller number of them.  Also, displaying the words takes up less space on the wall.  You don't need a spot for each letter, just post the words like a list.  Students are more likely to remember the words if they get several interactions with a small number of words rather than just skimming over a large number of words.  

Pull Words from Books or Topics of Study - 
New words will be more meaningful to students if they are connected to a book they have read or a science or social studies topic they have been studying.

Interact with the Words Frequently - 
Word walls are of limited value if the words are talked about once, posted, and then never revisited.  Students need several chances to hear, see, and use a new word in order to adopt it into their own vocabulary.  More ideas for interacting with word walls are posted below.

Include Pictures - 
Including pictures with vocabulary words will help jog students' memories.  Reminder pictures can be the difference between students being able to use the word wall independently and students needing help with or just not using the word wall.

Change them out Occasionally - 
If a word has been on the word wall for a while and students seem comfortable with it, change it out with a new word.  Little by little your mini word wall will morph throughout the year.


So what exactly is this "interacting" with word walls?  Here are some ideas that can be implemented in those little five minute gaps you find yourself in every so often:


vocabulary word wall


Thanks for stopping by, and happy teaching!


Friday, June 12, 2015

Hello From Northern Colorado!

Hello, all! My name is Nichole and I am so excited to be a part of Resources With Altitude! I also blog over at The Craft of Teaching.

The Craft of Teaching

I would love to share a quick Back to School freebie with you (other people are already thinking about back to school, right? It's not just me?) but first let me share a little about myself!

I just finished my 13th year of teaching. All 13 have been in Colorado! I have taught mostly 4th and 5th grade, and one lonely year of 3rd. 5th grade is easily my favorite grade to teach. They make me laugh!

Because they are a little weird.

I live north of Denver with my husband, 2 dogs and cranky cat.


I can't wait to share some ideas and get some great ideas from the other awesome bloggers here!

I know that you can't believe that I am already thinking about going back to school.

I can't help it.

I try to do other things and I always end up coming back to the new school year!

Maybe you are like me? School always on the brain? Well, if so, here is something you might be able to use in a few short weeks when we go back to school!

https://www.teacherspayteachers.com/Product/3-2-1-Back-to-School-Graphic-Organizer-849740https://www.teacherspayteachers.com/Product/3-2-1-Back-to-School-Graphic-Organizer-849740

I like to use this graphic organizer at the end of the first day or first week to get a pulse on how kids are feeling about the new school year. It's quick and easy and lets those students who don't always feel comfortable speaking up have a voice! I love to read them and see what's going through everyone's mind as we are just getting to know each other.

I am so looking forward to being a part of this collaboration!!  Stay tuned this weekend for more from our fabulous team!

craftofteaching.blogspot.com